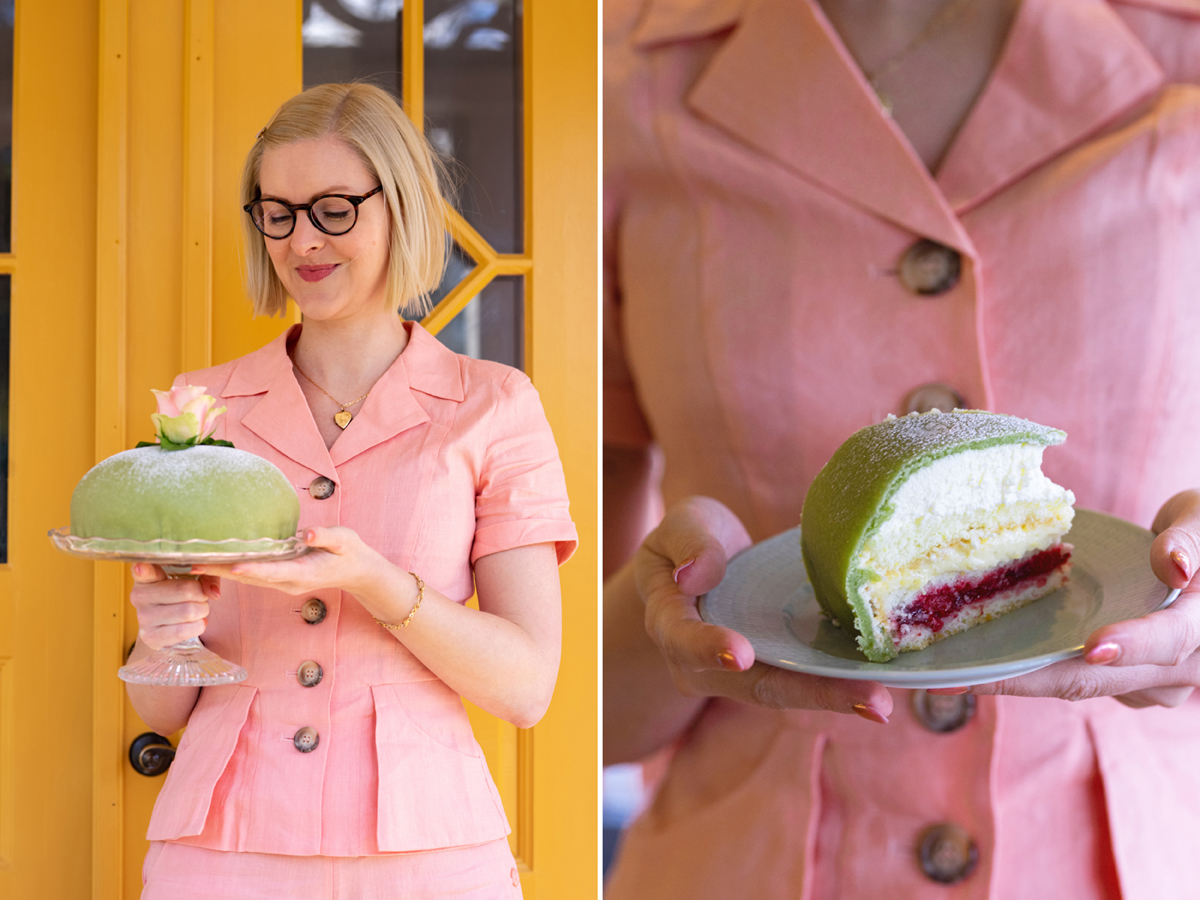
The “Princess cake” (or “Prinsess-tårta” as we say in Sweden) is a Swedish classic dating back to 1948 when the recipe was published in a cookbook and favored by the Swedish princesses. You’ll find these cakes in each and every patisserie and grocery store over here, but trust me, most of them are bland and full of additives.
My cake is made from scratch, with rich flavors – and it’s gluten free!
I hope you will give it a go!
A traditional princess cake should contain airy sponge cake, raspberry jam, vanilla custard, loads of whipped cream, and be covered with green marzipan topped with a pink marzipan rose and dusted with powdered sugar. In my recipe, I’ve done some minor alterations to further richen the flavors and I use organic ingredients when available.
I recommend starting with the marzipan one or two days before it’s time to cut the cake, as the almonds need to dry completely before you can get to the next step.
The cake is at its absolute peak from a few hours after assembling (when the jam and custard has moistened the sponge cake) to around 24 hours later. Leftovers can be refrigerated for a few days though.
You need:
3 layers of gluten free sponge cake base:
220 g organic free-range eggs (around 4 eggs)
180 g granulated sugar (2 dl / 0,85 cups)
150 g potato starch (2 dl / 0,85 cups)
1 ½ tsp baking powder
Zest from ½ an orange
Vanilla custard:
1 vanilla bean
50 g raw sugar or granulated sugar (just above ½ dl / ¼ cup)
250 g whole milk (2,5 dl / 1 cup)
60 g egg yolk from organic free-range eggs (around 3 egg yolks)
17 g corn starch (just above 2 tbsp)
12 g butter
Marzipan:
200 g organic almonds
225 g granulated sugar (2,5 dl / 1 cup)
1 egg white
1 ½ tbsp cold water
120 g powdered sugar (2 dl / 0,85 cups)
Green food coloring (I use chlorella,
which is a type of algae)
For assembling:
190 g high quality rasperry jam, the runnier the better (1 ½ dl / 0,6 cup)
115 g frozen raspberries, thawed at room temperature for some hours or in the fridge overnight (frozen ones will stay fresh longer and if defrosted slowly perfectly moist)
300 g whipping cream (3 dl / 1 ¼ cup)
1 pink rose
Powdered sugar
Instructions:
The marzipan:
- Put the almonds in a pot of water and bring it to boil. Pour out the water and press on each almond to remove the skin. Let the peeled almonds dry completely on paper towels over night or for a few hours.
- Mix the almonds in a food processor, add the sugar and mix into a fine powder.
- Add egg white and 1 tbsp of the water. Mix until you get a hard dough.
- Add the powdered sugar in batches and add more water if necessary. (If your mixer can’t handle the hard dough, scrape down marzipan from the sides, or continue kneading by hand).
- Carefully add a pinch/drop of food coloring at a time until you get the desired color.
- Roll the dough to a ball, cover it with plastic wrap and put it in the fridge while preparing the rest of the cake.
- The marzipan is easiest to work with within the first 24 hours. After that it will get dry and you will need to add a tiny bit of water to get it soft and flexible.
The sponge cake base:
- Preheat oven to 175° C (350° F) and grease a cake tin (I used a 22 cm / 8,5” cake tin and had enough batter left for a tiny cake for my birthday breakfast tray. You could use a 24 cm / 9,5” cake tin instead or just cut off some of the finished cake base as to make the cake perfectly balanced and not too high). Dust the greased cake tin with potato starch.
- In a mixer or with an electric beater, beat the eggs and sugar for a few minutes until light and fluffy.
- Combine the flour and baking powder in a bowl and sift it into the batter. Add the orange zest.
- Gently mix the batter with a spatula until just blended. Overdoing it will result in a rubbery cake!
- Pour into the greased and dusted cake tin.
- Bake for 30-40 minutes in the lower part of the oven, until a toothpick inserted as deep as possible comes out clean. The cake will look very pale so the toothpick trick is necessary to check if it’s done!
- Leave to cool a bit before removing it from the tin. Let it cool completely on a rack before assembling.
The vanilla custard:
- Slice the vanilla bean in half lengthwise. Put it together with the sugar in a saucepan. Use the sugar to scrub out the seeds and leave the vanilla pod in the sugar. Pour the milk over the sugar, vanilla pod and seeds. Bring to a simmer. Remove from heat, and cover immediately. Allow to infuse for 15 minutes.
- In a large bowl whisk the egg yolks and cornstarch carefully and make sure there’s no lumps.
- Remove the vanilla pod from the milk (you can put the vanilla pod in your breakfast yoghurt or in your vanilla powder to enrichen the vanilla flavor for future baking). Slowly pour the milk over the egg yolk mixture, while stirring constantly (to temper the egg yolks). Then pour the mixture back into the saucepan. Bring to a boil while stirring constantly with a whisk, for around 2 minutes, until thickened.
- Remove from the heat and then incorporate the butter. Pour into a clean bowl. Allow to cool. Cover with plastic wrap in contact with the surface of the custard, and refrigerate until completely cool and set.
- Before assembly, whip the custard with an electric beater to get it nice and fluffy.
Assemble the cake:
- Cut the cake base into 3 (each layer should be around 1,5 cm / 0,6” high for a perfectly balanced cake. Measure your cake base before cutting and if your cake is higher than 5 cm / 2” cut off a top layer and munch it up).
- Place the bottom layer of the cake base on a cake stand. Spread out the jam on this layer and top with the raspberries. Gently press down the raspberries with a spatula if they are too big and bulgy.
- Add the second cake base on top.
- Spread out the vanilla custard on top of the second cake base.
- Turn the final cake base upside down and add it. If the vanilla custard tries to escape, just smooth it in with a spatula.
- Whip the cream by hand until just lightly whipped (by whipping the cream by hand it will keep in shape longer and get a fuller flavor).
- Spread out most of the cream on top of the cake, gently shaping it like a dome. Use the rest of the cream to cover the sides. Make sure to cover all raspberries as they could stain the marzipan!
- Put the cake in the fridge while working on the marzipan.
- Take out the marzipan from the fridge and remove the plastic wrap. Press the ball to flatten it a little bit. Put it between two sheets of baking paper, plastic wrap or silicone baking sheets. Roll out the marzipan with a rolling pin. Make sure to turn the marzipan and the two baking sheets upside down and removing the marzipan from the sheets often, so that it doesn’t stick. Focus on rolling in the middle as not to make the edges too fragile. Roll out the marzipan until it is around 5 cm / 2” bigger than the cakes top + both sides.
- Remove one of the baking sheets. Make some tiny cuts into the sides of the marzipan circle to make it easier to shape. Now gently put the marzipan lid on top of the cake, using the top baking sheet as extra safety so that it doesn’t break or get scratched. Remove the baking sheet.
- Cut of excessive marzipan at the bottom (little by little rather than cutting of too much). Use your hands to gently shape the marzipan around the cake. Tiny holes can be repaired by adding small pieces of marzipan and smoothing it on with wet fingers. It is unfortunately impossible to get such repairs really smooth, so another alternative is to just cover it up with rose petals!
- Dust the top of the cake with powdered sugar.
- Cut the stem of a pink rose, leaving only about 3 cm / 1”. Press the short stem into the middle of the cake to secure the rose. Add a few leaves if you like.
- Et voilà, your cake is completed!